

Setting up automatic replies in Gmail is an excellent way to inform your contacts of your absence, especially during vacations or periods without internet access. This function allows a pre-programmed message to be sent automatically and helps manage communication efficiently.
To set up the automatic reply, you need to access the Gmail settings. Open the application, click on the "Three lines" icon in the top left-hand corner and select "Settings". Choose the account you want to set up and look for the "Auto-reply" option. From there, you can customize your message and define the period in which it will be active.
This feature is useful not only for vacations, but also for intense periods of work or other commitments. By following these simple steps, you can guarantee that anyone who sends you an email will receive a quick and automatic responsekeeping communication clear and organized.
Setting up your Gmail account
Setting up automatic replies in Gmail involves accessing the correct settings and understanding the different types of automatic replies available. Following these steps will help ensure that your account is ready to manage and respond to emails efficiently.
Accessing the Settings
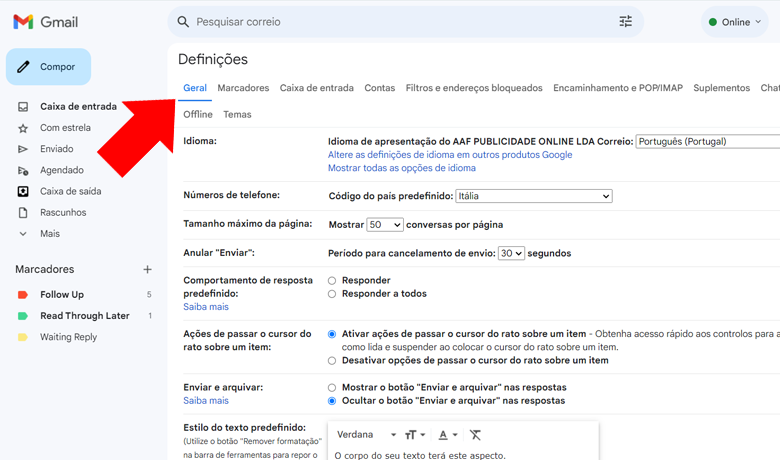
To get started, you need to access your Gmail settings. First, log in to your account via your browser. In the top right-hand corner, click on the gear icon to open the settings menu.

In the menu that appears, select the "View all settings" option. You will be taken to a new screen where you will find several tabs. Look for and click on the "General" tab. In this tab, scroll down until you find the "Vacation auto-reply" section. This is where you can activate and customize your automatic replies.
Knowing the Types of Automatic Response
There are different types of automatic replies that you can set up in the Gmail. The most common is the vacation auto-reply, which informs senders that you are out of the office and cannot reply at the moment.
Read also: How to free up space in Gmail
Another option is to set up automatic replies for emails received from specific addresses or containing certain keywords. This feature is useful for managing large volumes of email efficiently. Both types of replies allow you to personalize the message, including information such as absence dates, alternative contacts, and other useful instructions. Adjusting these settings helps you maintain clear and professional communication with your contacts.
Configuring Auto Answer
To set up an automatic reply in Gmail, you need to create a message and define the sending period. These steps help you notify your contacts of your absence efficiently.
Creating an auto-reply message
To get started, click on the gear icon in the top right-hand corner to access your Gmail settings. Then choose "View all settings". In the "General" tab, scroll down until you reach the "Auto-reply" section.
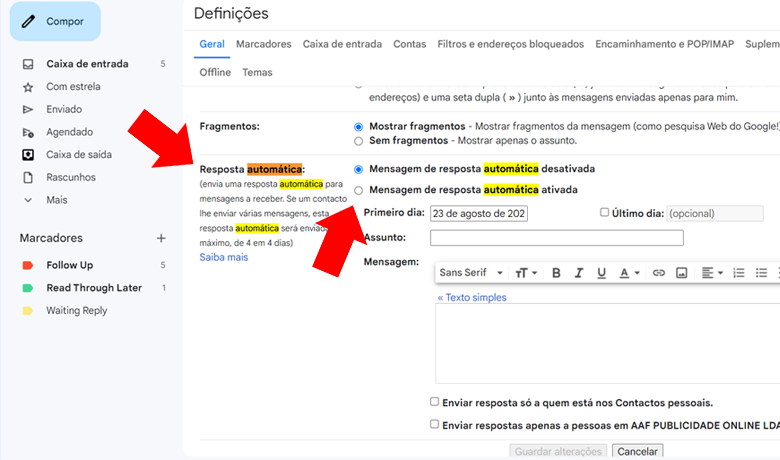
In the "Automatic reply" section, activate the automatic reply option. Enter a subject such as "I'm out of the office". Write the body of the messagestating the reason for your absence and the date of your return.
Make sure the message is short and to the point. For example: "Thank you for your e-mail. I'm out of the office until [date]. I'll get back to you as soon as possible." Use bold or italics to highlight important information.
Defining the Sending Period
To set the sending period, go to the "Automatic reply" section in the Gmail settings. In the "First day" section, select the date on which the automatic reply should start being sent.
If you wish, check the "Last day" box and select the end date for the automatic reply. This way, the reply will only be sent within this range.

Optionally, you can choose to send automatic replies only to your contacts or to everyone who writes to you. Check the appropriate box.
After setting the dates and recipients, save your changes by clicking the "Save changes" button at the bottom of the page.
Testing and adjusting
Once you have set up auto-reply in Gmail, it is essential to test its effectiveness and adjust the settings as necessary. This ensures that automatic replies are sent correctly and that the content of the message is appropriate.
Sending a Test Email
To check that the automatic reply is working, send a test email to your own account.
Open your Gmail and send a message to your address. Wait a few minutes and check whether you have received the automatic reply you set up. If the message doesn't arrive, review the settings in Gmail.
Read also: How To Recover Gmail Password
Check parameters such as the subject and body of the message. Make sure that important information is clear and well written. This is crucial to ensure that recipients understand your absence or any other relevant information.
Adjusting Settings Based on Feedback

Getting feedback from colleagues and friends can help identify details that need to be adjusted. They can provide insights into the clarity and objectivity of the automated message.
Once you have received this feedback, go back to your Gmail settings. Under "Settings" and "Auto reply", make the necessary adjustments to the text. Change confusing sentences and highlight important points.
If necessary, ask for more feedback and run further tests until the message is perfect. Small changes can make a big difference to the effectiveness of your auto-reply, ensuring that your recipients receive the information clearly and accurately.

Additional Tips
These tips will help you maximize the effectiveness of your auto-reply in Gmail.
| Tip | Description |
|---|---|
| Customize Message | Adapt the message to different audiences. |
| Spell check | Avoid mistakes by using text correction tools. |
| Specific Period | Set the correct dates for activating and deactivating the automatic response. |
| Personalized signature | Include contact information and a final greeting. |
| Frequent Updates | Keep the message relevant with regular revisions. |
Frequently Asked Questions
This guide covers the most common questions about how to set up automatic replies in Gmail and Google Chat.
What are the steps to set up a vacation message in Gmail via cell phone?
To configure a vacation message in Gmail from your cell phone, open the Gmail app and tap on the three-line menu. Go to Settings and select your account. Activate "Vacation auto-reply", set the deadline and enter the message.
How do I set a fixed message to reply automatically in Gmail?
First, go to Settings and then to "General Settings". Activate "Vacation auto-reply" and enter the dates and message you want. The message will be sent automatically to anyone who emails you while you're away.
Is it possible to leave predefined messages for automatic sending in Gmail?
Yes, it's possible. Gmail allows you to set up automatic replies using the "Vacation auto-reply" feature. This way, anyone who sends you an email during the specified period will receive your predefined message informing them of your absence.
How do I create and manage automatic messages in Google Chat?
In Google Chat, navigate to "Settings". Choose "Automatic messages" to create new ones or manage existing ones. Set up your automatic messages with desired content to ensure that your contacts are informed when you can't respond immediately.